Hace un tiempo atrás me enteré del proyecto Let’s Encrypt. Este proyecto es una nueva entidad certificadora (CA, AC) que tiene como proposito de entregar certificados de manera gratis, abierta y automatizada. Ya el 8 de marzo ya contaban con mas de 1 millon de certificados emitidos, excelente noticia ya que el proyecto lleva tan solo 3 meses funcionando.
Luego de encontrar un tiempo para hacer pruebas me decidí a probar el sistema con Nginx. En el proyecto a la fecha de hoy cuenta con plugins que te permite hacer el proceso más fácil con Apache. De todas formas conseguirlo con Nginx es sencillo.
El sistema funciona con un cliente letsencrypt que ejecutas en el servidor donde vas usar el certificado. En el servidor, debes tener una IP publica y el registro DNS que vas usar debe apuntar a esa IP ya que el sistema de validación verifica esa información. Puedes usar multiples nombres de dominio para usar en un certificado, dichos dominios deben apuntar a servidor donde se está generando.
En el servidor puedes realizar las operaciones de crear certificado, renovar o revocar. Si quieres entender con más detalle sobre como funciona el proceso por debajo te invito a leer How It Works
Manos a la obra
Lo primero que debes hacer es descargar el código del proyecto al servidor donde vamos a instalar el certificado. Debes tener instalado git en tu servidor, o lo puedes descargar mediante otro método desde la rama master en formato ZIP.
Con git ejecutas
git clone https://github.com/letsencrypt/letsencryptLuego vas al directorio
cd letsencrypt ./letsencrypt-auto --help
Lo último te chequeará las dependencias en el sistema y te generar un entorno virtual para correr el sistema (está hecho en Python). Saldrá una salida como esta -si todo va bien-
Checking for new version...
Creating virtual environment...
Installing Python packages...
Installation succeeded.
Requesting root privileges to run letsencrypt...
   /root/.local/share/letsencrypt/bin/letsencrypt --help

  letsencrypt-auto [SUBCOMMAND] [options] [-d domain] [-d domain] ...

The Let's Encrypt agent can obtain and install HTTPS/TLS/SSL certificates.  By
default, it will attempt to use a webserver both for obtaining and installing
the cert. Major SUBCOMMANDS are:

  (default) run        Obtain & install a cert in your current webserver
  certonly             Obtain cert, but do not install it (aka "auth")
  install              Install a previously obtained cert in a server
  renew                Renew previously obtained certs that are near expiry
  revoke               Revoke a previously obtained certificate
  rollback             Rollback server configuration changes made during install
  config_changes       Show changes made to server config during installation
  plugins              Display information about installed plugins

Choice of server plugins for obtaining and installing cert:

  --apache          Use the Apache plugin for authentication & installation
  --standalone      Run a standalone webserver for authentication
  (nginx support is experimental, buggy, and not installed by default)
  --webroot         Place files in a server's webroot folder for authentication

OR use different plugins to obtain (authenticate) the cert and then install it:

  --authenticator standalone --installer apache

More detailed help:

  -h, --help [topic]    print this message, or detailed help on a topic;
                        the available topics are:

   all, automation, paths, security, testing, or any of the subcommands or
   plugins (certonly, install, nginx, apache, standalone, webroot, etc)
Ahora el paso siguiente es generar nuestro certificado
./letsencrypt-auto certonly --standalone
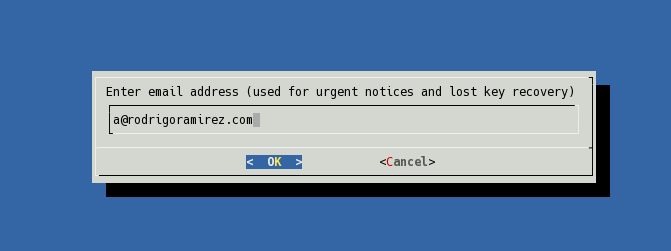
En esta etapa te pide una direccion de correo para recibir notificaciones de urgencia o recuperación del key.
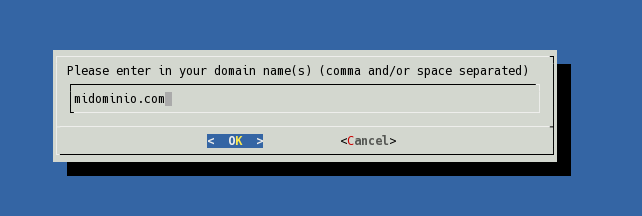
Ingresas el dominio del certificado, pueden ser varios separados por espacio. Para este ejemplo solo utilizamos uno.
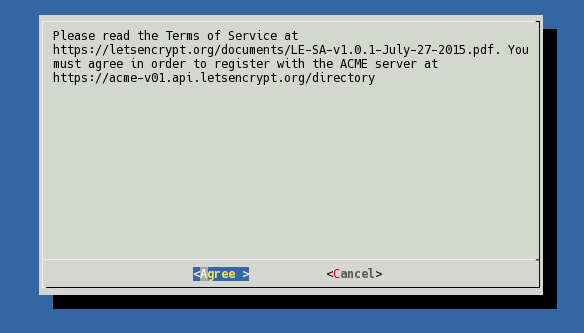
Aceptas la termino y condiciones
Cuando todo haya finalizado con exito tendrás en mensaje como este
IMPORTANT NOTES:
 - Congratulations! Your certificate and chain have been saved at
   /etc/letsencrypt/live/midominio.com/fullchain.pem. Your cert will
   expire on 2016-06-20. To obtain a new version of the certificate in
   the future, simply run Let's Encrypt again.
 - If you like Let's Encrypt, please consider supporting our work by:

   Donating to ISRG / Let's Encrypt:   https://letsencrypt.org/donate
   Donating to EFF:                    https://eff.org/donate-le
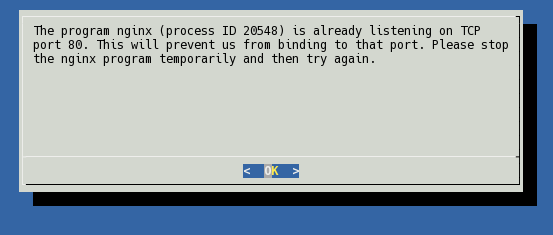
Algo importante: Cuando vayas a ejecutar el proceso, si tienes Nginx corriendo u otro corriendo en el puerto 80, debes detenerlo para generar el certificado, ya que si tendrás un error como este:
Para verificar si algo está corriendo en el puerto 80 puedes hacer lo siguiente
netstat -na | grep ':80.*LISTEN'
tcp        0      0 0.0.0.0:80              0.0.0.0:*               LISTEN
En este caso, detienes el servicio «service nginx stop» y vuelves a empezar
Configurando Nginx
Antes de poner la configuración, debemos tener claro lo siguiente.
En el directorio /etc/letsencrypt/live/midominio.com/ están las -por decir- las últimas versiones de los certificados, ya que son enlaces simbólicos a la versión actualizada de los archivos de los certificados. En ese directorio encontrarás 4 archivos.
- cert.pem: Certificado de tu dominio(s)
- chain.pem: Chain de Let’s Encrypt
- fullchain.pem: cert.pem + chain.pem
- privkey.pem: La clave privada del certificado del dominio(s)
Lo que vamos hacer en nginx es, primero leventar https y luego direccionar todo el http a https. Creamos el virtualhost o modificamos el existente para nginx.
Agregamos para servir HTTPS
server {
  listen  443 ssl;
  ssl_certificate /etc/letsencrypt/live/midominio.com/fullchain.pem;
  ssl_certificate_key /etc/letsencrypt/live/midominio.com/privkey.pem;
  ssl_protocols TLSv1 TLSv1.1 TLSv1.2;
  ssl_prefer_server_ciphers on;
  ssl_ciphers 'EECDH+AESGCM:EDH+AESGCM:AES256+EECDH:AES256+EDH';

  server_name midominio.com;
  # Only requests to our Host are allowed
  if ($host !~ ^(midominio.com)$ ) {
    return 444;
  }
}
Direccionamos todo lo que venga a HTTP a HTTPS.
server {
    listen 80;
    server_name midominio.com
    return 301 https://$host$request_uri;
}
Luego hacemos reload al servicio
service nginx reload
Ahora podemos verificar si todo quedó bien configurado con
https://www.ssllabs.com/ssltest/analyze.html?d=midominio.com
Ahora, podríamos agregar el auto-renew del certificado pero esto queda para otro artículo.


